Saturday, 15 April 2017

Install WordPress on AWS EC2 Instance

WordPress and AWS
After successful completion of first and second step i.e. creating an EC2 instanceand connecting to EC2 instance in AWS using PuTTY and Terminal respectively. Further moving ahead, it is time to install Apache, PHP, MySQL to run WordPress on an EC2 instance. If you are not familiar with command line / Linux commands just run these commands in same order.

NOTE: This instruction is for Amazon Linux and will not work if you are trying different machine image like Ubuntu or Windows Server.

Connect to your instance via PuTTY  (Windows) / Terminal (Mac OS) / Bash (Linux OS)

Just to make sure everything is up to date
sudo yum -y update

If you want, you may directly switch from ‘ec2-user’ user to root using sudo su command.

Install multiple software packages:
sudo yum install -y httpd24 php70 mysql56-server php70-mysqlnd

Start Apache Server:
sudo service httpd start

Create a page to check your PHP installation

a) vi test.php
b) Type i to start the insert mode
c) Type <?php phpinfo() ?>
d) Hit escape button and type :wq, now hit enter to exit
e) Open a browser and http://ec2-xxx-xxx-xxx-xxx.us-west-1.compute.amazonaws.com/test.php (use you public IP DNS followed by /test.php)

If you see a phpinfo page then you are good to move forward, otherwise you may want to start over.

Delete the test.php file as it is for the information only and you definitely don’t want to give away sensitive information about your server:

rm -f /var/www/html/test.php

Secure Start SQL service

Start MySQL service and run secure installation
sudo service mysqld start
sudo mysql_secure_installation

MySQL_Secure_installation
When prompted, enter a password for the root account. By default, the root account does not have a password set, so press Enter.

Type Y to set a password, and enter a secure password twice
1) Remove anonymous users? [Y/n] Y
2) Disallow root login remotely? [Y/n] Y
3) Remove test database and access to it? [Y/n] Y
4) Reload privilege tables now? [Y/n] Y

Restart MySQL to pick up the changes:
sudo service mysqld restart

Login into MySQL and Create a database for WordPress

Log in to the MySQL server as the root user and enter your MySQL root password when prompted
mysql -u root –p

Create a user name and password for your MySQL database.
CREATE USER 'aksgeek'@'localhost' IDENTIFIED BY 'aksgeekpassword';
Replace ‘aksgeek’ with your WordPress username and ‘aksgeekpassword’ with your strong password.


Create a database for WordPress:

 Create_database_for_wordpress


CREATE DATABASE `wordpressdb`;

(you can create a database with any name)

GRANT ALL PRIVILEGES ON `wordpressdb`.* TO "aksgeek"@"localhost";

FLUSH PRIVILEGES;
exit

Install WordPress
cd /var/www/html
wget https://wordpress.org/latest.tar.gz
tar -xzf latest.tar.gz
cd wordpress/
mv wp-config-sample.php wp-config.php
nano wp-config.php

 edit_wp-config
Start editing wp-config.php. (user arrow keys to move around)

define('DB_NAME', 'wordpressdb');
define('DB_USER', 'aksgeek');
define('DB_PASSWORD', 'aksgeekpassword');
define('DB_HOST', 'localhost');

Visit https://api.wordpress.org/secret-key/1.1/salt/ to randomly generate a set of key values that you can copy and paste into your wp-config.php file.
Ctrl + X
Save modified buffer (ANSWERING "No" WILL DESTROY CHANGES) ? Y
File Name to Write [DOS Format]: wp-config.php  hit Enter.

Move your WordPress installation to root or in subdirectory / folder

You may want to run your WordPress blog from root like your_public_dns.amazonaws.com/)  then
mv * /var/www/html/

Or

Most of you want to install it in a subdirectory or folder (for example, your_public_dns.amazonaws.com/blog, then
mkdir /var/www/html/blog
mv * /var/www/html/blog

To allow WordPress to use permalinks
sudo nano /etc/httpd/conf/httpd.conf

<Directory "/var/www/html">
    #
    # Possible values for the Options directive are "None", "All",
    # or any combination of:
    #   Indexes Includes FollowSymLinks SymLinksifOwnerMatch ExecCGI MultiViews
    #
    # Note that "MultiViews" must be named *explicitly* --- "Options All"
    # doesn't give it to you.
    #
    # The Options directive is both complicated and important.  Please see
    # http://httpd.apache.org/docs/2.4/mod/core.html#options
    # for more information.
    #
    Options Indexes FollowSymLinks

    #
    # AllowOverride controls what directives may be placed in .htaccess files.
    # It can be "All", "None", or any combination of the keywords:
    #   Options FileInfo AuthConfig Limit
    #
    AllowOverride None

    #
    # Controls who can get stuff from this server.
    #
    Require all granted
</Directory>

Find the section that starts with <Directory "/var/www/html"> and change the AllowOverride None line to AllowOverride All.

To ensure that the httpd and mysqld services start at every system boot
sudo chkconfig httpd on
sudo chkconfig mysqld on

Open a web browser and enter the URL of your WordPress blog, you should see the WordPress installation screen

Example for root installation:  http://ec2-xx-xxx-xxx-xxx-us-west-1.compute.amazonaws.com

or

for subdirectory / folder (blog): http://ec2-xx-xxx-xxx-xxx-us-west-1.compute.amazonaws.com/blog.

Wordpress_installation_finished

Enter your site name, username, password and email address and hit submit.


Congratulations!! You are running WordPress blog on Amazon Web Services (AWS) EC2 instance.


Troubleshooting

Having trouble updating and downloading themes/plugin in WordPress blog as it is asking for FTP credentials then run this command:
sudo chown -R apache:apache /var/www/html

Friday, 14 April 2017

How to Connect to EC2 Instance using PuTTY and Terminal

1_connect to instanceIn our last post, we learned how to create EC2 instance in AWS. After successfully launching our EC2 Linux instance, today we will connect to our instance so we can install and run WordPress. There are two methods via which we can connect to our Amazon EC2 Linux instance:
  1. A standalone SSH Client
  2. A Java SSH client directly from my browser (Java required)
2_standaloneinstance
Later seems easy to connect as most of the computer have java installed, let's get started and see how to connect our EC2 instance directly from browser.
First check whether you have java installed or your browser supports java or not?
chrome not supportted
All of you have encountered with error/problem while connecting to your instance in Chrome browser as the Chrome browser version 42 and above disabled the standard way their browser supports plugin.
firefox_java not supported
Now it’s Firefox turn: While trying on Mozilla Firefox 64-bit, I got a message saying it is 64-bit and will not run java. Another failed attempt.
win10_edge_java not supported
Our Last hope?: Using Microsoft Edge browser didn’t help either as it doesn’t have support plugin. My bad!
Old is Gold!? While checking for java on internet explorer (IE11), a pop-up window appeared mentioning “the page you are viewing uses java”. Finally a positive response, now it’s time to connect our instance  by
  1. Sign-in to AWS console –> EC2 dashboard-> running instance-> select running instance –> click on Connect button
  2. Select “A Java SSH client directly from my browser (Java required)”
  3. Your username will be mentioned by default as “ec2-user”. Now enter the location of private key path (which you have downloaded in step 7 of creating ec2 instance) C:\folder\location\private_key.pem and select save key location
  4. Now click on “Launch SSH client” button .
IE not connecting


Wait! Nothing happened, the same pop-up appeared and didn’t connect. Looks like IE 11 on 64bit Windows 10 won’t work.

firefox-32bit limited support for plugin

This time around installing and running on  32-bit Firefox, I have had encountered with a different message (gladly) but – Limited support for the plugin, therefore will not run java.  There are other browser options like opera, safari which I didn’t try and leaving up to you to try it using above steps and leave a comment below whether they worked for you or not.

It’s time to go with the first option of connecting instance via standalone SSH client:

Connect to Amazon EC2 Linux Instance using PuTTY

For Windows user
  1. Download PuTTY, PuTTYgen

    PuTTYgen

  2. Open PuTTYgen –> click “Load” button –>  Windows explorer will open browse to the .pem file location (private key that you have downloaded while creating EC2 instance) and select “All Files (*.*)” otherwise you won’t be able to see your .pem –> click “open”

    PuTTYgen_2

  3. Select “save private key”. PuTTYgen warning window appear to ask you to save this key without a passphrase key? If you want to then you may choose otherwise it’s not necessary. In short press “yes” and save the .ppk file.

    PuTTY Alert


    PuTTY_hostname

  4. Now start PuTTY and enter hostname username@public_dns_name. e.g. ec2-user@52.xx.xxx.xxx48 or ec2-user@ec2-xx-xxx-xxx-xxx.us-west-1.compute.amazonaws.com. 
    (The username may vary depending on which AMI you have installed. You may find this information in example when you click Connect button in console) –> Connection type SSH and port 22

    PuTTY_auth


  5. In Category pane, expand connection, then expand SSH, click on Auth –> Browse your .ppk and click Open.

    PuTTY Alert-auth

  6. If you connect for the first time, PuTTY display security alert –> choose “Yes”.

    puTTY_login_success
  7. Connected!


For Mac OSX/Linux User:


EC2 Connect via Terminal
  1. Open Terminal

  2. Locate your private key (.pem) key. (In my case, private key is in download folder)

    cd ~/Downloads

  3. Your key must not be publicly viewable for SSH to work. Use this command:

    chmod 400 your_privatekey.pem

    or

    chmod 400 /location/private_key.pem

  4. Now connect to your instance using below command:

    ssh -i "your_privatekey_name.pem" ec2-user@ec2-52-xx-xxx-xxx.us-west-1.compute.amazonaws.com You will see message like this:
    The authenticity of host xxx:xxx:xx:xx:xx can't be established.
    RSA key fingerprint is xx:xx:xx:xx:x:xx:xx:xx:xx:xx:xx:xx:xx:xx
    Are you sure you want to continue connecting (yes/no)?


  5. Type Yes and enter

  6. Now you are successfully connected your EC2 Linux instance using Terminal.
On next, we will see how to install WordPress in AWS.

Wednesday, 12 April 2017

Getting started with Amazon Web Services (AWS)–Create an EC2 Instance

As you are already aware of Amazon Web Services (AWS) that offer on-demand cloud computing solution with a pay-per-use approach. As Amazon offer 12 months free trial to check out their services, we exactly going to do that and also recommend you sign up for AWS Free tier. If you already did then let’s get started and learn together on how to create an EC2 instance in AWS.


First, take a quick look at Amazon Free Tier benefits:

Amazon EC2 (Compute)
  • 750 hours per month of Linux, RHEL, or SLES t2.micro instance usage
  • 750 hours per month of Windows t2.micro instance usage
Amazon S3
(Storage)
  • 5GB of standard storage (20,000 Get Requests, 2,000 Put Requests)
Amazon RDS
(Database)
  • 750 Hours per month of database usage
  • 20 GB of DB Storage: any combination of General Purpose (SSD) or Magnetic
  • 20 GB for Backups (with RDS Magnetic storage; I/Os' on General Purpose [SSD] are not separately billed)
  • 10,000,000 I/Os'
Amazon QuickSight
(Analytics)
  • 1 GB of SPICE capacity 1 user perpetual free tier
  • 10GB of SPICE capacity the first 2 months for free for a total of 4 users
Offers that won’t expire after 12 months
  • AWS Lambda, DynamoDB, AWS Database Migration Service etc..

A. Log in to your AWS-console;
aws console

B. Go to Services on top left corner and select EC2, to enter in EC2 dashboard;


ec2_launch instance

C. Now click on “Launch Instance”


To successfully launch an EC2 instance you have to follow 7 steps:


1. Choose Amazon Machine Image (AMI)

aws choose ami
  • You can choose any AMI from amazon marketplace as per your requirement but in this tutorial, I will focus only on free tier eligible products and services. Therefore, I am selecting Amazon Linux AMI (64-bit)
2. Choose an Instance type
 aws instance type
  • Select General purpose t2.micro (free tier eligible) instance and click on “next Configure Instance Details”
3. Configure Instance Details
 configure instance aws
  • You may leave the setting to default but I want you to look into the settings:
    • Subnet: you may choose any one default subnet available or may create a new subnet;
    • Auto-assign Public IP: keep it as default (use subnet setting (enable). If needed, you may enable elastic IP to connect it to your domain;
    • Enable termination protection: check this to protect against accidental termination;
  • Click on “Add Storage” button.
4. Add Storage
 add storage aws
  • You may go ahead with the default setting by clicking on “Add Tags” button or you may increase storage size up to 30GB for Volume type General Purpose SSD or Magnetic storage. (increase storage as per your requirement, make sure don’t decrease it from 8GB)
5. Add Tags 
 add tags ec2 aws
  • Skip this step and continue with clicking on “Configure Security Group”
6. Configure Security Group
 security group ec2
configure security group ec2
  • In Assign a security group: Select “create a new security group” (if you don’t have any) or “choose from existing one”;
  • Provide Security Group name or leave it as default ( launch-wizard-1) – I recommend you to add name which may later help you in identifying the security group;
  • Add description – enter description which makes this security group explanatory for you;
  • In SSH select source My IP (recommended option), so it will allow only your IP to connect to SSH or you can assign custom IP address or just select “Anywhere” (least secure option);
  • Add HTTP to connect to server port to make your instance accessible;
  • For the last step click on “Review Instance Launch”.
7. Review Instance Launch
 review ec2 instance
  • You may go through the summary of your instance. In case you want to make any changes, just do it.
  • Once you go through all the details available on Review instance launch, click on “Launch” button, new window pop-up - “Select an existing key pair or create a new pair window”.
  • Now create a new key pair (never proceed without a key pair, otherwise you won’t be able to connect your instance) and enter key pair name;
ec2 key pair
  • Download the key pair and keep it in a secure location as you will NOT be able to download the file again after it's created.
  • Finally, click Launch Instances.
ec2 instance launched 

You have successfully launched an EC2 instance on AWS, now go to your EC2 dashboard and view running instance. This guide may be used for creating a different EC2 instance with different machine image.
On next post, we will move further any see how we can connect to our instance and install WordPress.

Monday, 25 November 2013

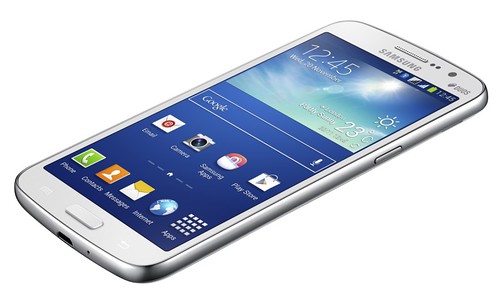
Samsung unveils Galaxy Grand 2 with 5.25-inch display

samsung galaxy grand 2

Samsung announced the Galaxy Grand 2, successor to its most popular smartphone Samsung Galaxy Grand. The Samsung Galaxy Grand 2 is a mid-range dual SIM Android smartphone features 5.25-inch HD (1280x720) TFT display, a 1.2GHz quad-core processor running Android 4.3, 1.5GB of RAM, 8GB internal memory expandable via microSD up to 64GB and 8MP rear facing camera and  1.9MP HD camera in front. This smartphone will arrive in White, Black and Pink color option in selective regions. Head past the break for detailed specs.

Samsung Galaxy Grand 2 Specifications:-

  • Network - HSPA+
  • Processor - Quad Core 1.2GHz
  • Display - 5.25” HD (1280x720) TFT
  • Memory - 1.5GB (RAM) + 8GB (Internal Memory) + microSD (up to 64GB)
  • Camera - 8MP AF + LED Flash / 1.9MP (HD)
  • OS - Android 4.3 (Jelly Bean)
  • Connectivity - WiFi a/b/g/n, BT4.0, GPS + Glonass, USB 2.0
  • Sensor - Proximity, Accelerometer, Compass, Light, Hall Sensor
  • Additional Features - ChatON, Samsung Hub, S Health, Group Play, S Travel, S Translator, Samsung Link, Story Album
  • Dimension - 146.8 x 75.3 x 8.9 mm, 163g
  • Battery - 2,600mAh

Sunday, 17 November 2013

Nokia Lumia 2520 tablet hits AT&T on November 22

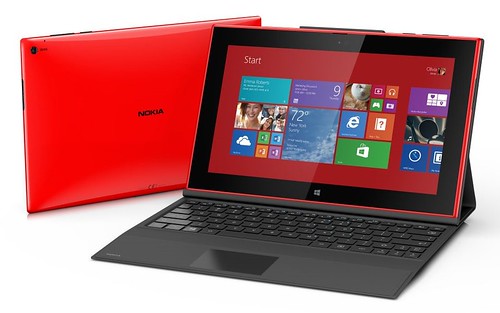
Nokia Lumia 2520

Nokia’s brand new Lumia 2520 tablet will be available in black from AT&T beginning on November 22 for $399.99 with a two-year agreement, or for $199.99 with a two-year agreement if you also purchase a Nokia Lumia 925, Nokia Lumia 1020, or Nokia Lumia 1520 smartphone from AT&T.

Nokia Lumia 2520, Nokia's first Windows tablet features LTE, a 10.1-inch Full HD (1920 x 1080) display with Corning Gorilla Glass 2, 2.2 GHz quad core Qualcomm Snapdragon 800 processor, running Windows RT 8.1, 2GB of RAM, a large 8,000 mAh battery, offers fast charging up to 80% in just one hour along with a 6.7MP rear camera featuring Zeiss optics and a 2MP front facing camera.  Other specs include 32GB internal memory, expandable via microSD card slot, Bluetooth, WiFi and NFC.